Beginner VR Setup Guide for First-Time Users
Beginner VR setup guide searches exploded in 2026 because first-time buyers are discovering something important very quickly:
Buying a VR headset is easy. Setting it up correctly is what determines whether you love VR or regret the purchase.
Most new users expect VR to work like a phone or game console. You charge it, turn it on, and instantly understand everything.
Then reality hits.
The headset feels heavy.
The image looks blurry.
Motion sickness kicks in.
Controllers stop tracking.
Wi-Fi pairing fails.
The room suddenly feels too small.
That frustration causes many beginners to quit VR within the first few weeks. Fortunately, almost all of these problems are preventable when you understand the setup process before your first session.
This beginner VR setup guide breaks everything down in plain English so you can confidently move from unboxing to full immersion without the confusion.
Why VR Feels Overwhelming for Beginners
VR introduces a lot of unfamiliar terms very quickly:
- IPD
- Refresh Rate
- Guardian Boundary
- Pancake Lenses
- Fresnel Lenses
- Passthrough
- PCVR
- Mixed Reality
For experienced users, those terms are normal.
For beginners, it sounds like learning another language.
The bigger issue is that many buyers do not understand what type of VR user they are yet.
Some people want:
- Gaming
- Fitness
- Movies
- Social apps
- Productivity
- Sim racing
- PCVR
Your goals completely change which headset and setup make sense.
Understanding the Most Important VR Terms
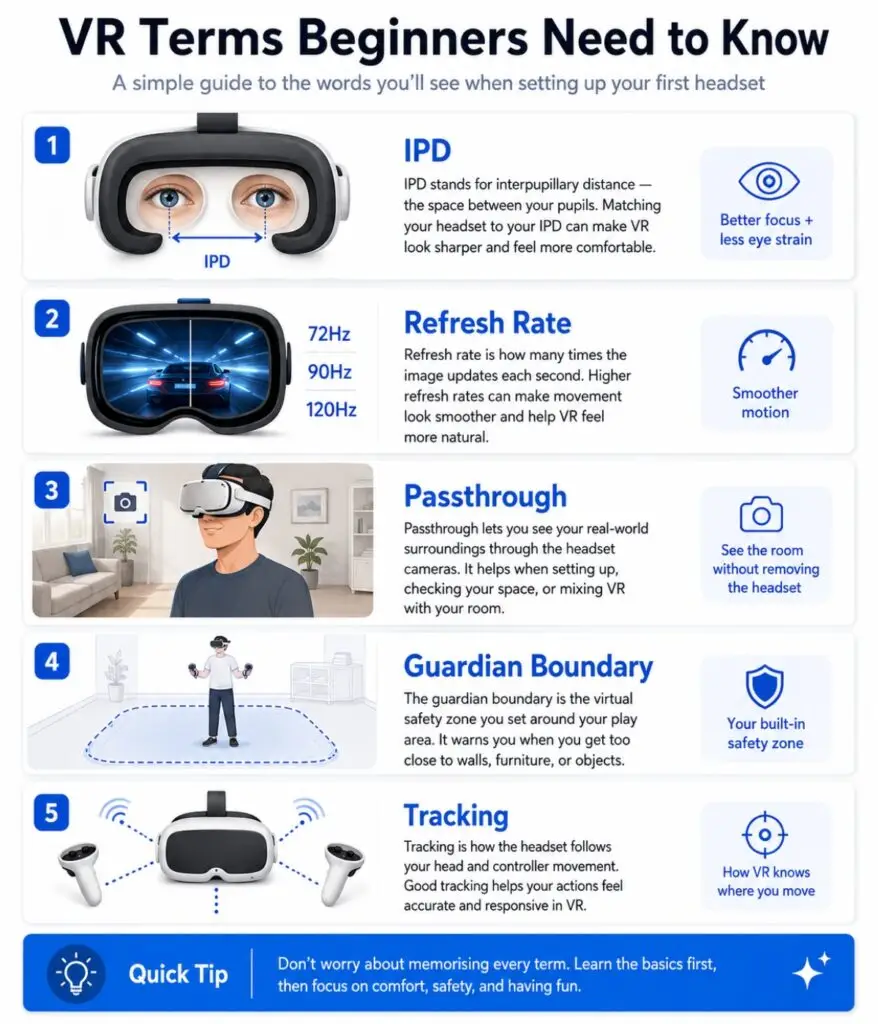
What Is IPD?
IPD means Interpupillary Distance.
That is simply the distance between your pupils.
If your headset lenses are not aligned properly with your eyes, the image becomes blurry and uncomfortable. Incorrect IPD settings often cause:
- headaches
- eye strain
- dizziness
- blurry visuals
Quest 3 allows smoother IPD adjustment with a scroll wheel, while Quest 3S uses fixed positions.
What Is Refresh Rate?
Refresh Rate measures how many times the display updates every second.
Higher refresh rates create smoother motion.
Lower refresh rates increase the risk of motion sickness because your brain notices visual lag more easily.
For beginners:
90Hz or higher usually feels much more comfortable.
What Is Passthrough?
Passthrough allows you to see your real room through the headset cameras.
This is one of the biggest reasons modern VR feels less intimidating.
On Quest headsets, you can instantly enter passthrough mode by double-tapping the side of the headset.
Standalone VR vs PCVR
This is the first major decision every beginner faces.
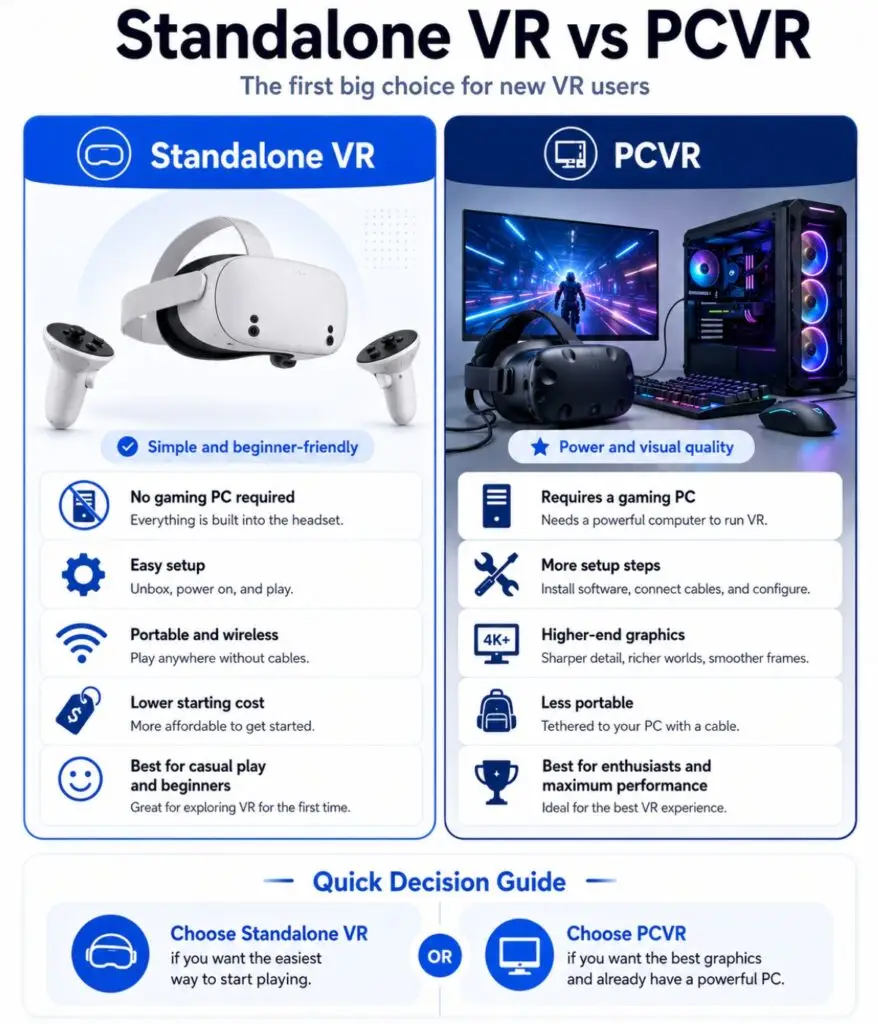
Standalone VR
Standalone VR headsets work without a gaming PC.
Examples:
- Meta Quest 3
- Meta Quest 3S
- Pico 4
Advantages:
- Wireless freedom
- Easier setup
- Lower total cost
- Portable
- Beginner-friendly
For most new users, standalone VR is the best starting point.
PCVR
PCVR connects the headset to a gaming computer.
Advantages:
- Better graphics
- More advanced games
- Sim racing support
- Larger SteamVR library
Disadvantages:
- More setup complexity
- Cable management
- Wi-Fi troubleshooting
- Higher total cost
PCVR is incredible when configured correctly, but beginners often underestimate the setup process.
How Much Space Do You Need for VR?
This is one of the biggest beginner concerns.
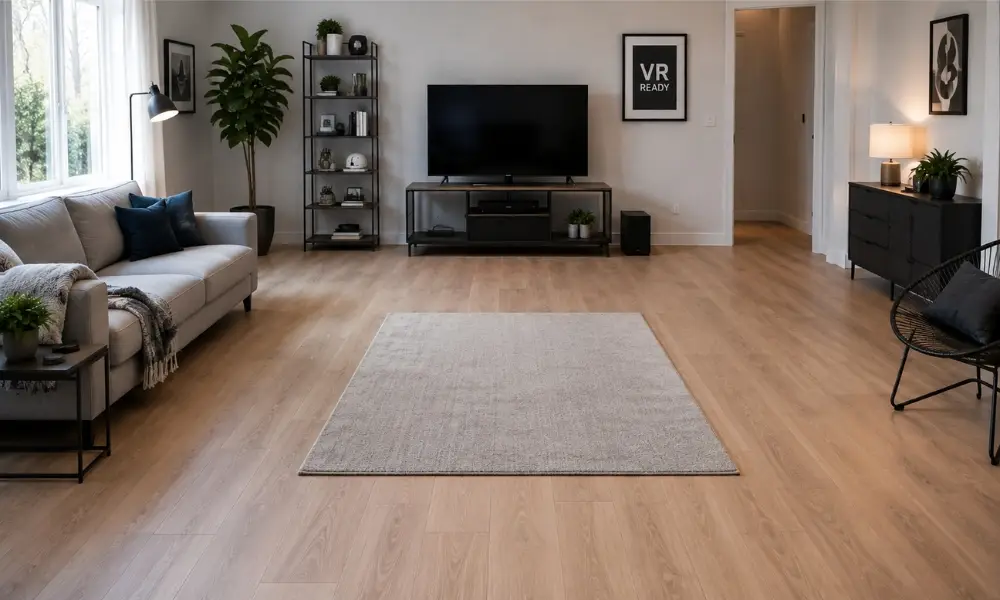
Minimum VR Space
For standing or seated VR:
- About 3 ft × 3 ft
For roomscale VR:
- At least 6.5 ft × 6.5 ft
That extra space matters because VR movement becomes surprisingly physical.
The Rug Trick Most Beginners Do Not Know
Experienced VR users often place a small rug or yoga mat in the center of the room.
Why?
Your feet instantly know where the center is without removing the headset.
This simple trick prevents:
- drifting too close to walls
- hitting furniture
- losing orientation
Tracking Killers That Ruin VR Setup
VR tracking cameras rely on environmental reference points.
Some rooms accidentally confuse tracking systems.
Common Tracking Problems
Mirrors and Glass
Reflective surfaces confuse the cameras.
Examples:
- mirrors
- windows
- glass doors
- glossy marble floors
If possible:
cover reflective surfaces during setup.
Direct Sunlight
Sunlight can:
- blind tracking cameras
- overexpose sensors
- permanently burn VR screens
Never leave headset lenses facing sunlight. Fresnel lenses especially act like magnifying glasses.
Completely Dark Rooms
Tracking systems need visible reference points.
Pitch-black rooms break tracking.
Use balanced lighting instead.
Choosing Your First VR Headset
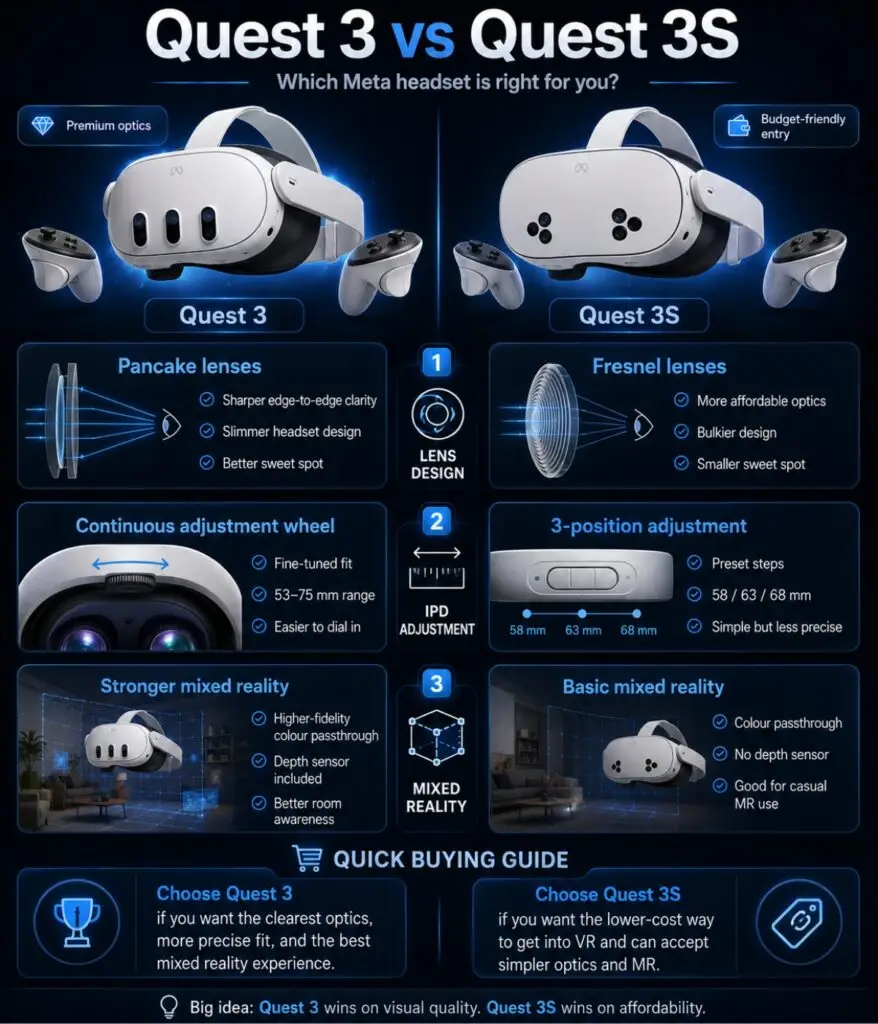
Meta Quest 3S
Best Budget Beginner Headset
The Quest 3S became the default recommendation for most beginners because it combines:
- standalone wireless VR
- Snapdragon XR2 Gen 2 performance
- mixed reality passthrough
- beginner-friendly setup
Pros:
- Affordable
- Easy setup
- Strong app library
- Mixed reality support
Cons:
- Fresnel lenses
- Smaller sweet spot
- Fixed IPD positions
Meta Quest 3
Best Overall Beginner VR Experience
Quest 3 improves:
- visual clarity
- lens quality
- mixed reality quality
- long-term comfort
Its pancake lenses create much clearer edge-to-edge visuals compared to Fresnel lenses.
Pros:
- Pancake lenses
- Better clarity
- Better IPD adjustment
- Strong PCVR support
Cons:
- More expensive
- Battery life still limited
PlayStation VR2
Best for PS5 Owners
PSVR2 delivers:
- OLED visuals
- eye tracking
- strong immersion
- premium console gaming
But:
- it is wired
- requires PS5 or PC adapter
- setup is less flexible
Pancake vs Fresnel Lenses Explained Simply
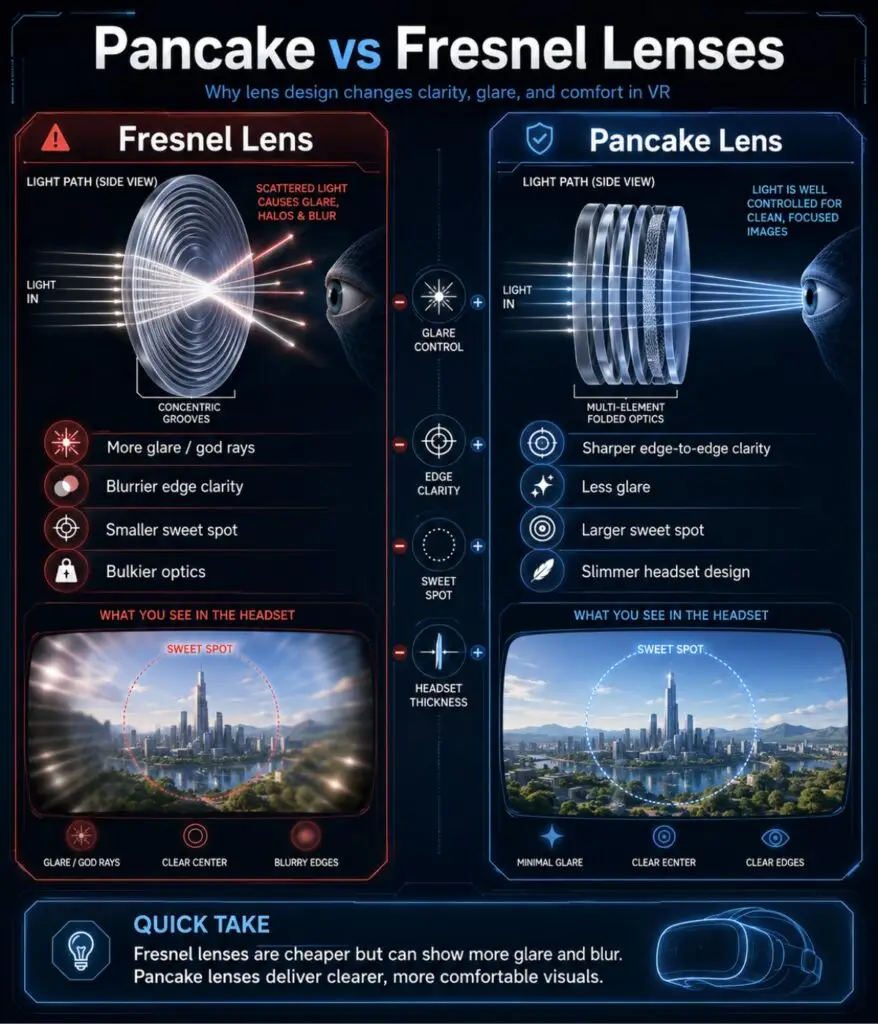
Fresnel Lenses
Used in:
- Quest 3S
- Quest 2
- PSVR2
Problems:
- glare
- edge blur
- smaller sweet spot
Pancake Lenses
Used in:
- Quest 3
- Pico 4
Benefits:
- clearer visuals
- reduced glare
- slimmer headset design
- easier reading
For beginners, pancake lenses usually feel more premium immediately.
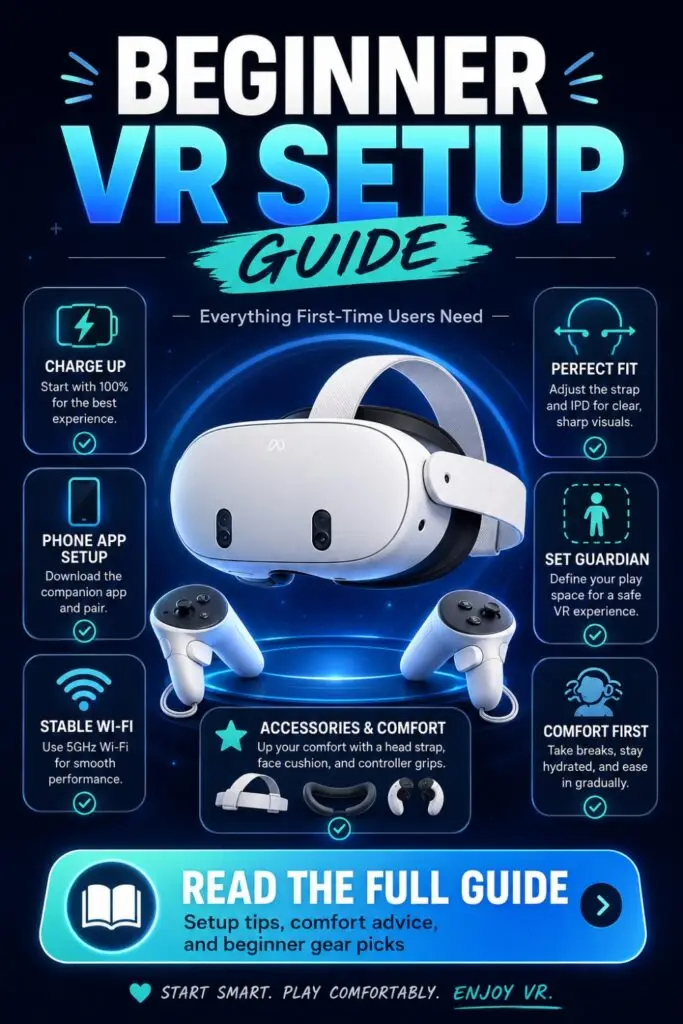
Step-by-Step Beginner VR Setup Guide
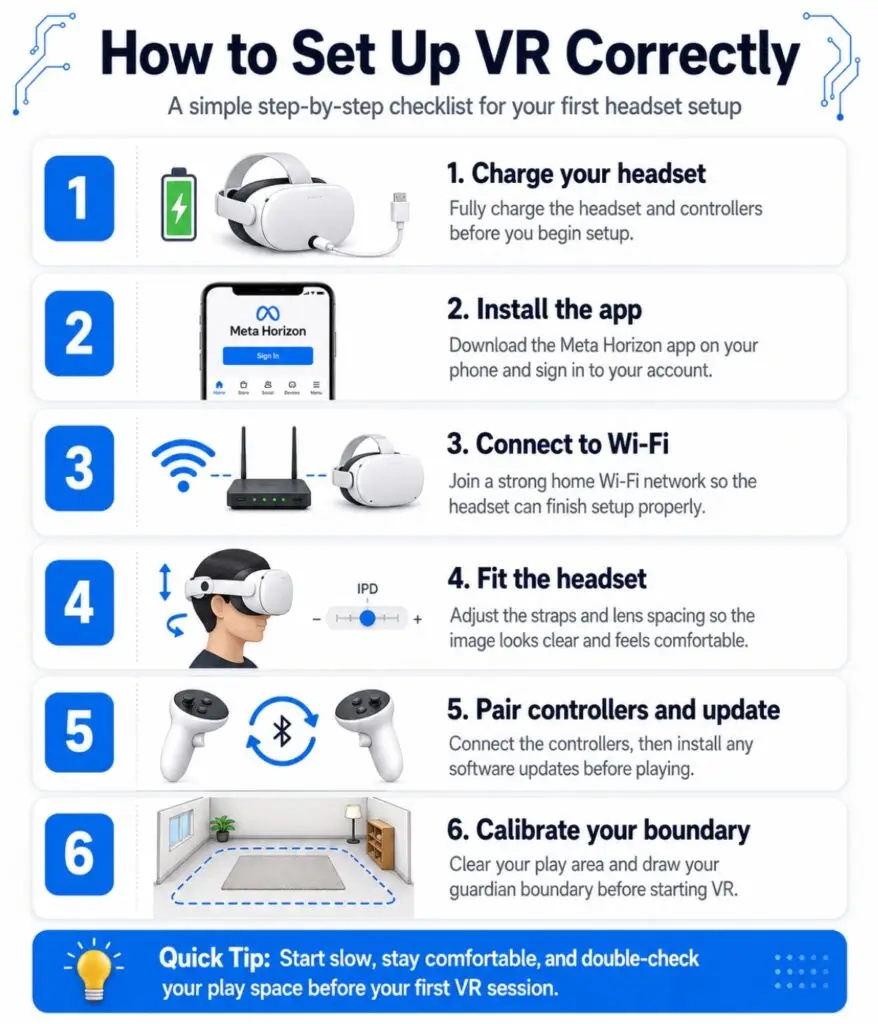
Step 1: Charge Everything First
Before setup:
- Fully charge the headset
- Fully charge controllers if rechargeable
- Remove controller battery pull tabs
Do not begin setup with low battery levels during firmware updates.
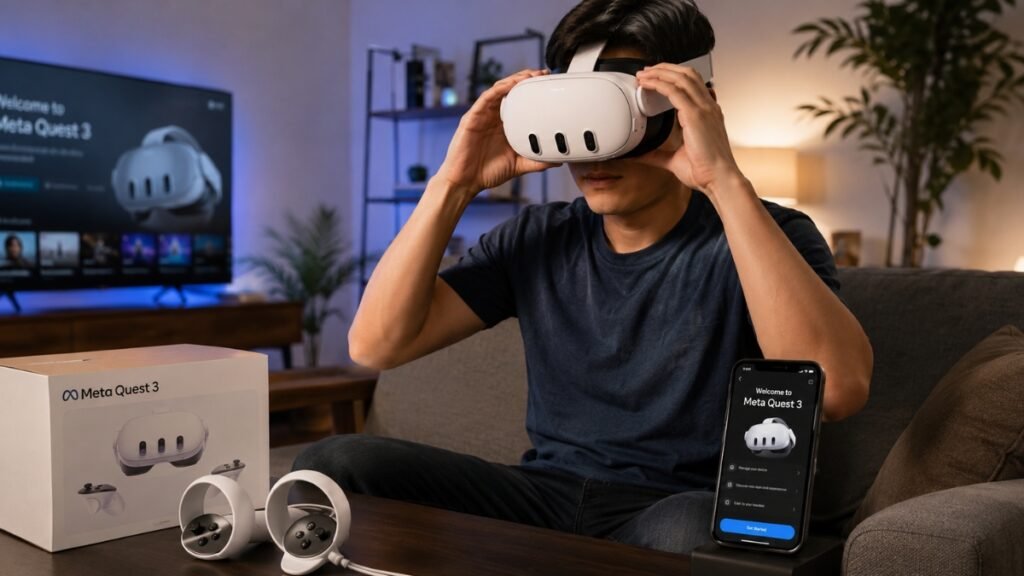
Step 2: Download the Companion App
For Quest headsets:
Download the Meta Horizon app on your phone.
This handles:
- pairing
- updates
- account setup
- purchases
Step 3: Adjust the Headset Correctly
Do not tighten the headset immediately.
Instead:
- Loosen straps first
- Place headset comfortably
- Tighten gradually
- Adjust lens spacing
- Fine-tune top strap
The goal is balance, not pressure.
Step 4: Configure IPD
Adjust the lenses until:
- text looks sharp
- visuals feel comfortable
- eyes feel relaxed
Improper IPD causes many beginners to think VR “looks blurry.”
Step 5: Create Your Boundary
Trace your safe play space carefully.
Leave physical buffer room between:
- walls
- TVs
- desks
- furniture
Never place boundaries directly beside obstacles.
Step 6: Update the Headset
Modern VR headsets almost always require updates during initial setup.
Stay connected to:
- strong Wi-Fi
- charging power
Do not interrupt firmware updates.
Beginner VR Motion Sickness Guide
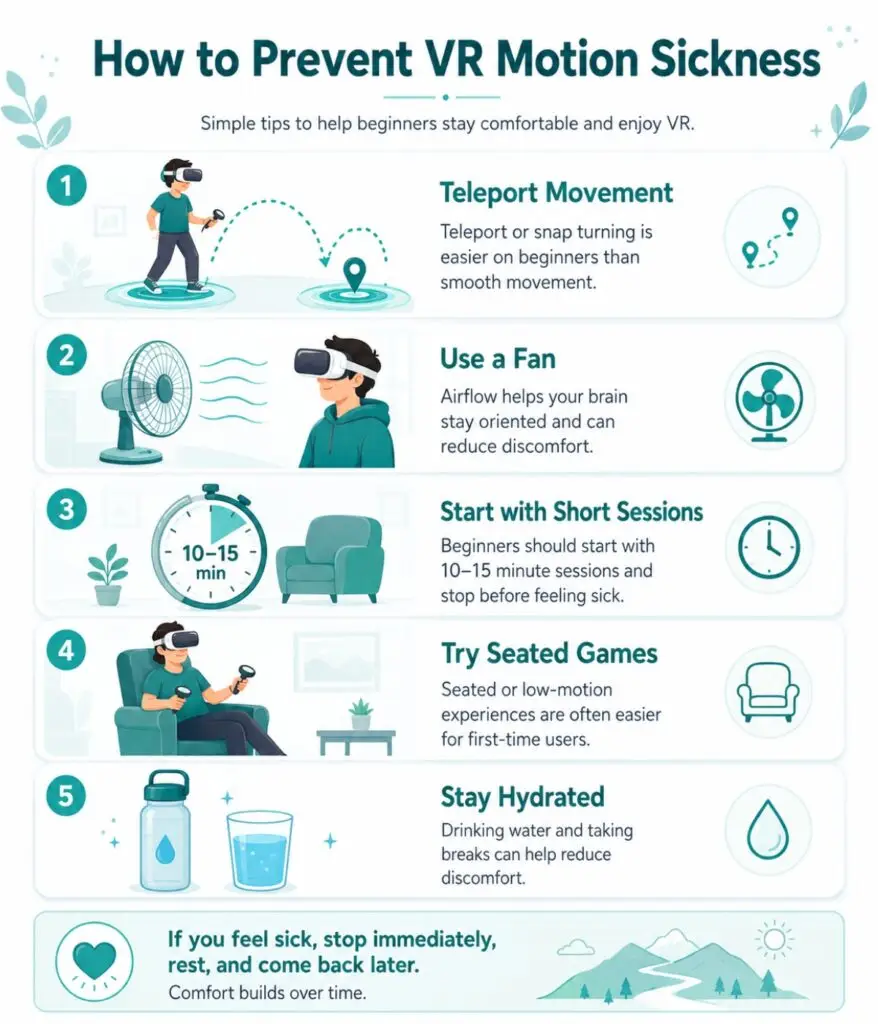
Why VR Causes Motion Sickness
Your eyes detect movement while your inner ear detects that your body is stationary.
That mismatch creates nausea.
How to Prevent VR Motion Sickness
Start With Comfortable Games
Good beginner choices:
- Beat Saber
- Walkabout Mini Golf
- Moss
- Job Simulator
Avoid:
- rollercoasters
- flying games
- fast shooters
Use Snap Turning
Snap turning rotates the camera instantly in small steps.
Smooth turning often causes nausea early on.
Take Short Sessions
Play:
- 5 to 15 minutes initially
Stop immediately if you feel:
- dizzy
- sweaty
- warm
- tired
Never “push through” sickness.
Use a Fan
A fan:
- cools you down
- reduces sweating
- helps your body stay oriented
It works surprisingly well.
Essential VR Accessories for Beginners
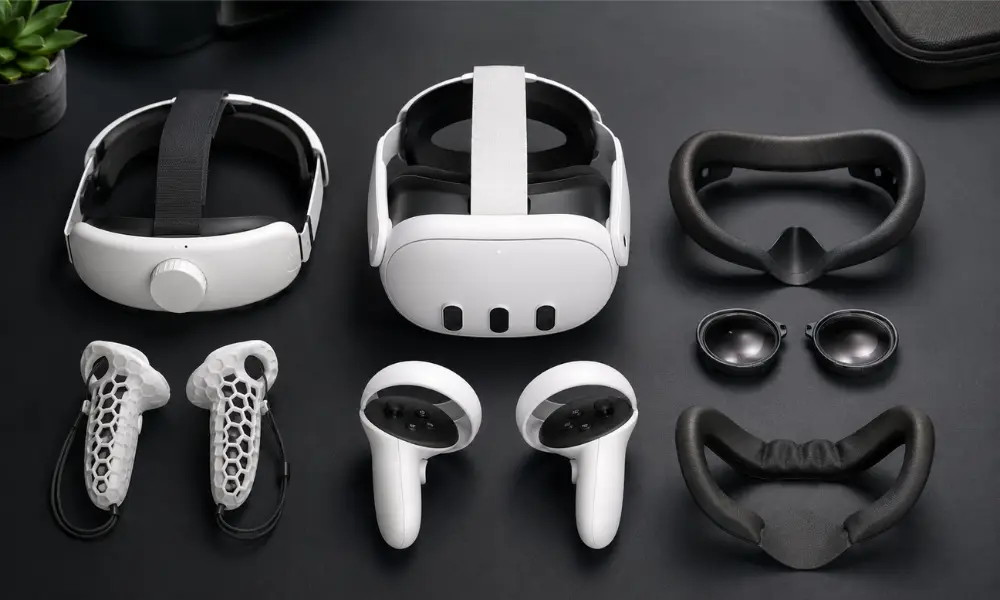
Better Head Straps
Stock straps are usually uncomfortable.
Recommended upgrades:
- BoboVR
- Kiwi Design
Benefits:
- improved comfort
- better weight balance
- longer battery life
Facial Interfaces
Leather or ice-silk facial interfaces:
- reduce sweat absorption
- improve hygiene
- increase comfort
Controller Grips
Knuckle grips prevent accidental controller throws.
Especially useful for:
- Beat Saber
- fitness games
- Gorilla Tag
Prescription Lens Inserts
If you wear glasses:
lens inserts are safer and more comfortable.
They prevent scratched headset lenses.
Common Beginner VR Mistakes
Leaving Headsets Near Windows
Sunlight permanently damages VR screens surprisingly fast.
Always:
- store headsets away from sunlight
- use lens covers
- use carrying cases
Cleaning Lenses Incorrectly
Never use:
- paper towels
- alcohol
- Windex
- liquid sprays
Use microfiber cloths only.
Weak Wi-Fi for PCVR
Wireless PCVR needs:
- strong 5GHz or 6GHz Wi-Fi
- Ethernet-connected gaming PC
- low network congestion
Weak Wi-Fi creates lag and stutter.
FAQ Section
What is the best beginner VR headset?
The Meta Quest 3S is the best beginner VR headset because it combines affordable pricing, standalone setup, and modern mixed reality features.
How much room do I need for VR?
At least 6.5 ft × 6.5 ft for roomscale VR.
Can VR damage your eyes?
VR does not permanently damage healthy eyes, but incorrect IPD settings and long sessions can cause temporary strain.
Why does VR make some people sick?
VR motion sickness happens because your eyes perceive movement while your body remains still.
Can I wear glasses in VR?
Yes, but prescription lens inserts are safer and more comfortable.
What happens if sunlight hits VR lenses?
Direct sunlight can permanently burn the displays inside the headset.
Final Thoughts
VR feels overwhelming at first because it combines:
- gaming
- spatial tracking
- optics
- networking
- human physiology
But once setup is done correctly, the experience becomes incredibly immersive.
For most beginners:
- Quest 3S is the safest budget entry
- Quest 3 is the better long-term upgrade
- Comfort accessories matter immediately
- Motion sickness improves gradually
- Proper room setup prevents most problems
The goal is not buying the most expensive headset.
The goal is creating a setup you genuinely enjoy using.